Saturday, November 19, 2011

This little light of mine...

For the millionth time in my life, I found something I could do nearly every day and probably happily turn into a side business. Each time I strumble upon a new craft or a technique that I could see working on all through the year for some type of craft booth, I name it. Today's endevor: "This Little Light of Mine Boutique".
Okay, so I won't quit my day job, but I do have to share what I made. I am aware that this technique is by no means new, but it is new to me; I've seen many candles with stamped images over the 12 years I've been stamping, but have never ventured so far as to figure out how to do it. After seeing my pal, Debbie's project, I dashed off to the dollar store to collect the supplies I needed. For $20, I am one happy stamper and hopefully everyone on my gift list will be too because I have 13 candles!;)
Enough yappin' girl, show us the goods:

Stampendous Stamp Set: "Snowy Short Stack" and Copics

Stampabilities Stamp from the 90's and Copics
The sentiment on the back of this one reads "Baked with love to warm your heart"

Penny Black Stamp-new release at Hobby Lobby this month
The sentiment on the back of this one reads "Snowmen fall from Heaven one flake at a time"

Penny Black Stamp-between 2001-2002
The sentiment on the back of this one reads "Merry Christmas" in scrollwork


I *NEED* to go to the store and buy some taller candles and some teeny tiny candles to keep playing with this technique...so many fun ideas! If you haven't tried this yet, DO IT! You won't be sorry!

Hugs and HOOTS,
<3 Alicia

Tuesday, August 16, 2011

Back to school...something to HOOT about!

Though school has already started for many, we are just getting ready in my district. I try to make a little "sumthin' sumthin'" for the people on my team each year, so when my dear friend, Lisa, owner of The Craft's Meow, gave me this awesome little stamp set, I knew I could put it to good use right away!

I used my Stampin' Up! Top Note Die for the goody bag toppers in Real Red and Kraft. I stamped all the images with Chocolate Chip, Real Red, and Wild Wasabi Inks. I embellished with google eyes (WOOT), SU! brads, and some super fun green twine by WRMK.

I used an old retired SU! lined stamp for the back...a perfect little message spot.
I know all the teachers will need to recharge with a few bottles of water as they set up their classrooms, so some tasty water flavor packets will come in handy!
Well, friends, I gotta' run...back to work to prep,prep,prep in the AM!
Hugs and HOOTS,
<3 Alicia

Wednesday, August 3, 2011

Hear YE, Hear YE...your presence is requested!

A very dear friend of mine is celebrating his daughter's FIRST birthday in serious style! His too sweet wife asked me for some input on the invitations, and you know I can't just stop there... ;)
They've decided to go with an Alice in Wonderland theme, so I got right to work on the invite options-ENJOY!

Option One: One Classy Queen
Front

Detail

Back


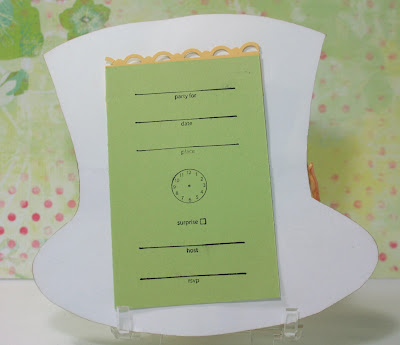
Option Two: The Mad Hatter Girls It Up
Front
 

Detail

Back


Tell me, friends, which do you prefer?

Hugs and HOOTS,
<3 Alicia

Tuesday, August 2, 2011

A color challenge and a lift!

I had so much fun participating in last week's SplitcoastStamper.com Sketch Challenge, I had to push myself a little farther and try out my first color challenge, this week! The color combo for SCS-CC334 included:
1) Whisper White
2) Basic Grey
3) Tempting Turqoise
I have to admit, I wasn't too sure about this combo at first, but once I strolled through the challenge gallery, I was ready to rock it! A quick rumage through my retired Designer Series Paper packs resulted in a couple sheets from the fifth avenue line in Basic Grey :) I decided to flip through the current Stampin' Up! catty for a layout to copy and was pleased to find a great card on page 109 featuring the "Just Believe" stamp set. I don't have that set, but I did have this retired hostess set, "Kind and Caring Thoughts"! I stamped the foilage in versamark directly onto patterned paper and embossed it in white, embellishing the main panel with some rinestones on a few martha stewart punched butterflies. Then I investigated how the ribbon was attached on the sample and had a go at it, using some whistper white ribbon that I colored with my SU! Basic Grey marker...AWESOME RESULTS!Finally, I used my new "Petite Pairs" sentiment set to stamp half the phrase on a circle of vellum, and then embossed!
 

I'm really happy with how this card turned out and I sure enjoyed teh challenge of having a set of specific colors to work with...I might just be hooked! :)
Hugs and HOOTS,
<3 Alicia
Posted by Picasa

Monday, August 1, 2011

Resistance is futile!

Dear Mr. Brown (aka UPS Delivery Guy),
I've missed you; I really have. I so look forward to the sound of your truck rolling heavily over the complex entrance gate: kuh-chunck...front wheels, kuh-chunck...back wheels; and then a screech-sigh as you step on the brake and put that giant truck of goodness into park. A ding-dong on the doorbell and a wagging dog tail can tell me only one thing...you've come for me!


Are those *business supplies*?! No, no..I won't be needing those!
 

THIS IS WHAT I'VE *REALLY* BEEN WAITING FOR!
After much fondling, and too much time mounting new stamp sets, it's time to dig in!
 

I used the new "Delicate Doily" set to create a 3 1/2" x 4" gift card holder. In an attempt to show-off the versatility of this set, I went ahead and used the border punch to create ornament toppers and voila-from doilies to ornaments! Paired with a "Petite Pairs" sentiment, this crumb cake, wild wasabi, and ridinghood red card is ready to go!
 

So, you see, Mr. Brown, I missed you so much, I just coudln't resist re-joining Stampin' Up for at least a few months! Now you may be wondering if it was realy *you* or if I just did it for the discount...can't I have both? ;)
Hugs and HOOTS,
<3 Alicia (in apartment 96)
Posted by Picasa

Sunday, July 31, 2011

Treehouses make my heart HAPPY

Someday, when I own my own home, I will find a house with a sturdy tree in the backyard. Whether our home is filled with gallivanting children or not, this tree will hold a tree house, for sure! As a child, I was always jealous of my friends who:
a) had a giant trampoline
b) had pet chickens
c) were allowed to pin up posters of hotties such as J.T.T on their walls with push-pins
and
d) had a tree house
I would most certainly be jealous of this adorable squirrel and his blue-jay friend, for their tree house is fit for a king!
 

I drew out the house shape, stamped the wood grain by Hero Arts, embellished with some adorable patterned papers by My Little Shoebox, and set to work on that scalloped roof using my SU! punch. The adorable mushroom and squirrel stamps are by Prima and were a total score at their warehouse sale for 50 CENTS EACH!
I really enjoyed adding in all sorts of bitty details on this card, especially this Tim Holtz pin and paper cloud:

Oh, I couldn't resist embellishing the inside either! Check out this sweet sentiment from Michael's dollar bin:


I can see myself getting a bit carried away with these little tree house cards-I have a TON of cute tree-dwelling critter stamps...SWOON!
I'm off to map out my ideal tree house...send me pics if you happen to have one in your own backyard! :)
Hugs and HOOTS,
<3 Alicia

...after a while, crocodile!

After a while, all of us crafters seem to look around, scratch our heads, and ask ourselves where in goodness' name all this crafty crap came from! With all the "pretties" that are constantly manufactured, it can be difficult to keep up with all the new product, but most of us tend to save things "for later". We just seem to *know* that *someday* the most *perfect* project will come along and we will instantly know that *IT IS TIME*.

Hmmmm.

I really enjoy watching Kristina Werner's Make a Card Monday and Finally Friday videos on YouTube because she is always piling on the "gems" of her stash as if there is no tomorrow. Don't pretend you don't hoard these little bits away and save them for just the right moment...;) It's both painful and exhilerating to watch her dive in and annihilate an entire package of $5.99 3D stickers on one card. I admire her gusto!
Recently, an online scrapbooking friend passed away unexpectantly after her battle with breast cancer; my heart aches for her family and all of her someday plans...she was much too young. I watched her post entry after entry of beautiful scrapbook pages, and entry after entry of "hauls" ful of "pretties" that she'd never get to use. :(
The point is, both of these situations have really made me think about how I approach a new project. After some pondering of my existence, I decided to head to my scrapbook room to unwind and I started by grabbing up a pile of coordinating products that I ADORE and have been saving "for later".
Meet Albert and Sirius...aren't they adorable? I piled on my favorite retired SU! ribbon and buttons along with several Sassafrass Lass chipboard shapes, some WRMK Bakers Twine, and even some bitty black pearls for eyes on my friends.
 

I hope you will contemplate your own existence and really ask yourself just how long you will hang on to all those "pretties"...go one, dive in...I DARE YA! ;)
Hugs and HOOTS,
<3 Alicia
Posted by Picasa

Thursday, July 28, 2011

What's old is *new*...

Greetings night owls! I'm up late tonight playing in my scrap room and it is ooooh so lovely! Cruisin' around SplitCoastStampers.com this afternoon, I was struck by this week's sketch challenge and HAD to play along.

I've been drooling over the new Stampin' Up! catalog so I decided to pull out some oldies but goodies from my retired pile and tie 'em in with a couple new toys to liven things up. I am really enjoying the twine, this new lace punch by EK Success, and this doily stamp set by Martha Stewart Crafts. :)

Most of all, I had fun stamping the sentiment from two different stamp sets by stamping "cherish" first, then by omitting "thinking of" and only inking up "you" from the teeny tiny wishes stamp set. I will have to think outside the box more and challenge myself to this more frequently because I loved the results!
Thanks for stopping by my friends and happy stampin'!
Hugs and HOOTS,
<3 Alicia

Monday, June 13, 2011

It's a beautiful day in the neighborhood...

Happy Monday, all! Things are going well here in New Mexico and yesterday was a great day full of fun and directionless quality time with my mom. We went to church, hit Michael's Arts and Crafts Store, Borders, and grubbed on some McDonald's chicken nuggets (they are a weakness of mine).
While at Michael's I found that the Making Memories $50 "grab bags" of goodies they've had around for the last month or so were marked down to $10 each. I love me some MM, and the embellishments in the bags were pretty recent and very fabulous so I had to pick out three. :)
My mom and I stayed up until 2:30 am chatting, me working on the card below and her coloring in a new coloring book I bought her for Mother's Day. I had to bust out some of my new embellishments and other goodies for this card:

I used some of my new Echo Park papers (Life is Good, line) from Hobby Lobby, along with some MM embellishments like the button brads and mini metal-rimmed tag to show off this too stinkin' cute stamp by Hero Arts. The adorable toad stool and lady bugs were an idea from my mom and are by DoodleBug...PERFECT!

I really adore everything about this card and it will be tough to give it to my mom's neighbor! On Saturday I was walking my little brother (age 10) to the park and we passed a garage sale where the gal gave my brother a bunch of Barney VHS tapes and a talking Barney stuffed animal. The woman's 19 year old son has Downs Syndrome like my little brother, which sparked her generosity; I wanted to be sure and thank her properly...the way us crafters do best!
Have a fab start to your week and maybe involve yourself in a RAK of your own! ;)
Hugs and HOOTS,
<3 Alicia

Saturday, June 11, 2011

I'm Back: A Welcome Celebration

Hello dear friends! It has been far too long since I have blogged my crafty endeavors, but it has been quite a full year! I am so glad to have my mojo back!
I am in New Mexico this month visiting my mom who is going through chemo and a bilateral mastectomy for breast cancer. She is being such a trooper and I know her positive attitude will be what gets her through. <3
I flew out from California this week and made sure I took every bit of luggage allowable without having to pay extra, which meant taking along a small scrapbook tote and my Cricut! :) My clothing bag was 7 pounds over the 50 pound limit, so I did have to leave all my patterned paper behind...it clocked right in at 7 POUNDS! I won't pretend I'm embarrassed, a girl needs her supplies!
In light of this torture, I *had* to head out to Hobby Lobby yesterday and happend to come home with some echo park papers, new copics, and tons of Dear Lizzie ribbon. <3 WOOT!
Here's the resulting card after my fun shopping trip with my sister:

I used Dress up Anya by The Greeting Farm and altered her hairstyle by cutting her long locks off and adding the hairbuns from the Flutter Anya instead. Altering this image was SO fun and I foresee many more in the coming days.
If you haven't tried this yet with your TGF stamps, DO IT! You can't tell the image has been cut or altered once it's colored up, see:

I paper pieced Anya's T-shirt from the Dress Me Up set using the new Echo Park papers I bought at Hobby Lobby. The paper pack came as a scrapbooking kit, so I used some stickers from the set as well as some of the banners from the papers to embellish my card. A little Cricut work on that scallop, and I was all set!
I'm so glad you stopped by to see what was new and I look forward to checking in quite a bit while I am here because I have lots of time to craft!
Hugs and HOOTS,
<3 Alicia

Sunday, January 2, 2011

Dreaming of warmer weather-sewing tutorial

I've been away from my blog, dear friends, but not away from my craft room! I collect American Girl Dolls as well as papercraft,so I have been making things for my dolls the past few months. I made a photo-tutorial for a super quick top that I thought some of you might enjoy making with a little girl in your life, so I'll post it here. This project is a great way to up-cycle an old blouse, and takes about 30 minutes to complete with a little girl. The example would also work for Barbies, if your daughter/niece/grandaughter/ect. doesn't have an 18" doll.
Click the photo below to view the tutorial! :)


I hope you enjoy this and it is useful! I am working on making a doll blog to link to this blog so I can keep all my creative ventures in the same place.

Hugs and HOOTS,
<3 Alicia